Kubernetes — The Orchestrator!
Fundamentals | Last Update: 2026
1. Kubernetes Defined
Kubernetes (in short K8s) is an open-source container orchestration system for automating software deployment, scaling, and management. Originally designed by Google, the project is now maintained by a worldwide community of contributors, and the trademark is held by the Cloud Native Computing Foundation. (from Wikipedia)
As we’ve already covered what Microservices are and what containerization is, the next step in evolution, and it’s a big step from Docker (which is a containerization platform) is Kubernetes.
Kubernetes is de facto platform that enables Microservices architecture with containers and DevOps principles to thrive and succeed.
2. Kubernetes Explained
Kubernetes is the most popular container orchestrator, providing a robust set of tools and services to manage complex, multi-container applications efficiently.
Kubernates: Automates the deployment, scaling, and management of containerized applications.
Kubernetes is a complex platform made up of multiple applications, services, components, and concepts working together. It introduces various layers of abstraction, such as master and worker nodes, each with its own software components. Additionally, there are application layer components like Deployments, Pods, and Namespaces, and infrastructure components like Services and Volume Claims.
We’ll break it down step by step to make it easier to understand.
A simple analogy
Think of Kubernetes like a human organism: cell -> tissues -> organs -> systems -> organism
- Container (the cell): The basic building block, like a red blood cell.
- Pod (a tissue): A group of containers working together, similar to heart muscle tissue.
- Deployment (an organ): Manages multiple pods, like the heart managing blood flow.
- Worker Node (organ system): Hosts multiple deployments, akin to the circulatory system.
- Kubernetes (organism): The entire system works together, just like a human body.
Just as an organism is made up of various cells, tissues, organs, and systems, Kubernetes is built from multiple components working in harmony.
Notes From the Author
As I’ve mentioned, Kubernetes is a complex topic that’s challenging to grasp in one go (and even harder to explain 😅). Not everything is linear and straightforward. Some of the points covered are high-level overviews (like what an orchestrator is), while others dive into more specific, low-level parts of Kubernetes (like ReplicaSets, Labels, etc.).
Please take all the diagrams with a pinch of salt, as they are specific slices designed to illustrate each topic better.
The Orchestrator
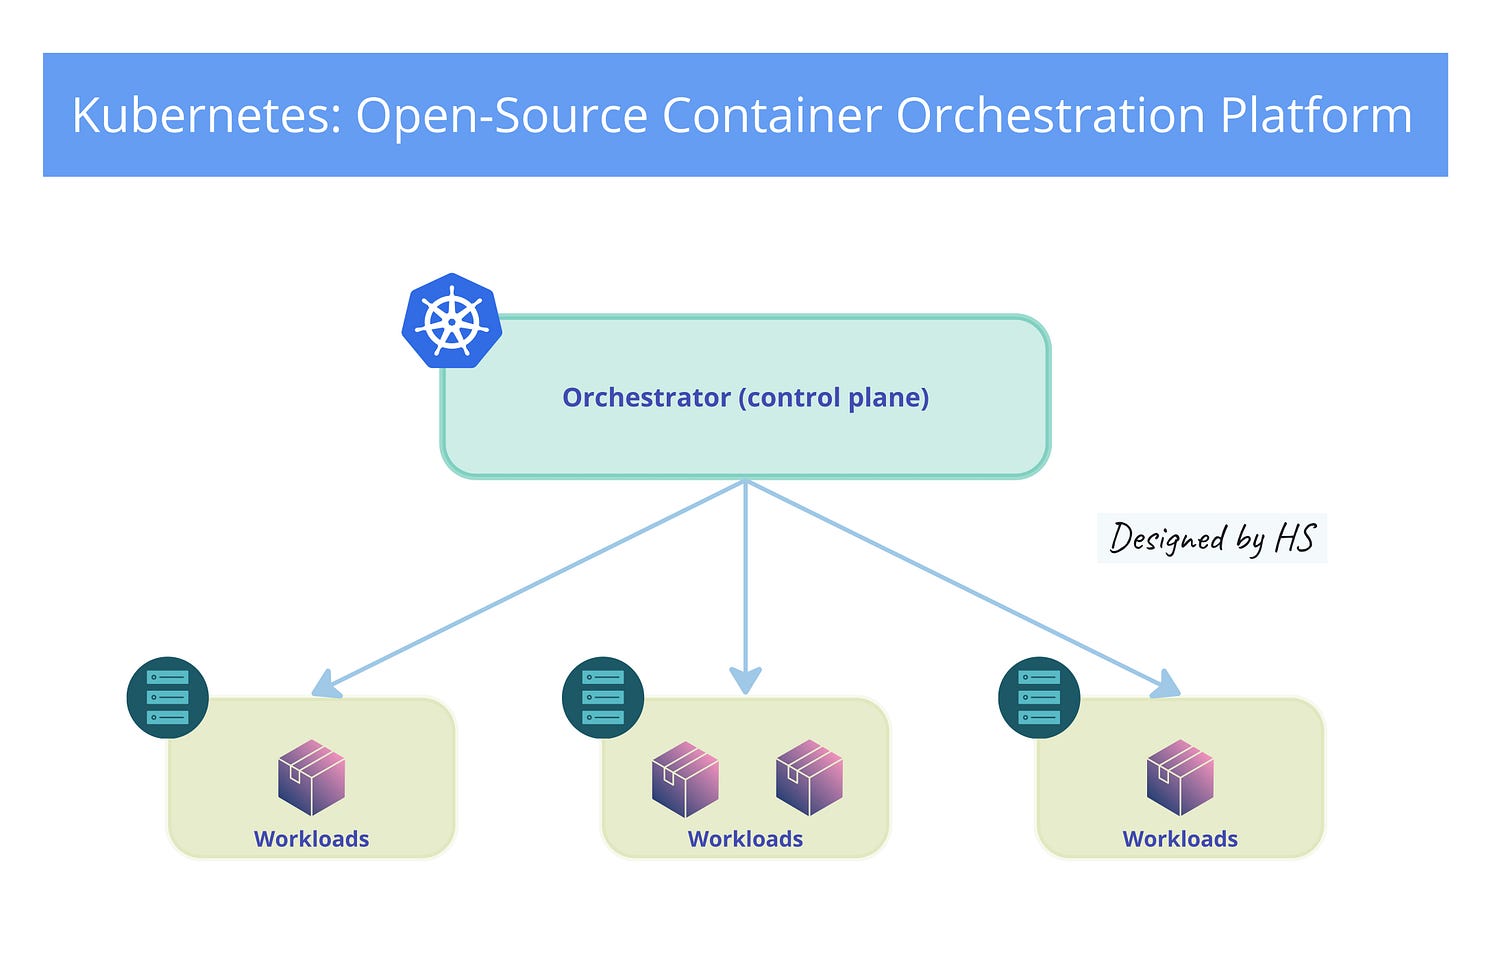
An orchestrator in the context of Kubernetes is a system that automates the deployment, management, scaling, and networking of containers. It ensures that containerized applications run smoothly by handling tasks such as:
- Scheduling containers to run on available nodes in a cluster.
- Managing the lifecycle of containers, including starting, stopping, and restarting them as needed.
- Scaling applications up or down based on demand.
- Monitoring the health of containers and replacing any that fail.
- Networking containers to ensure they can communicate with each other and with external services.
Kubernetes vs Docker
Kubernetes and Docker are both essential tools in the world of containerization, but they serve different purposes and complement each other well.
Docker focuses on creating and running containers, while Kubernetes is about managing and orchestrating those containers across multiple nodes.
Docker is great for development and testing environments, whereas Kubernetes is designed for production environments where you need to manage large-scale applications.
Docker
- Purpose: Docker is a platform that allows developers to build, package, and distribute applications as lightweight, portable containers. These containers include everything needed to run the application, such as libraries, system tools, and code.
- Use Case: Ideal for creating and running individual containers. It simplifies the development and deployment process by ensuring that applications run consistently across different environments.
Kubernetes
- Purpose: Kubernetes is an orchestration tool designed to manage and scale containerized applications across a cluster of machines. It automates the deployment, scaling, and operations of application containers.
- Use Case: Best suited for managing complex, multi-container applications at scale. Kubernetes handles tasks like load balancing, scaling, and ensuring the health of containers.
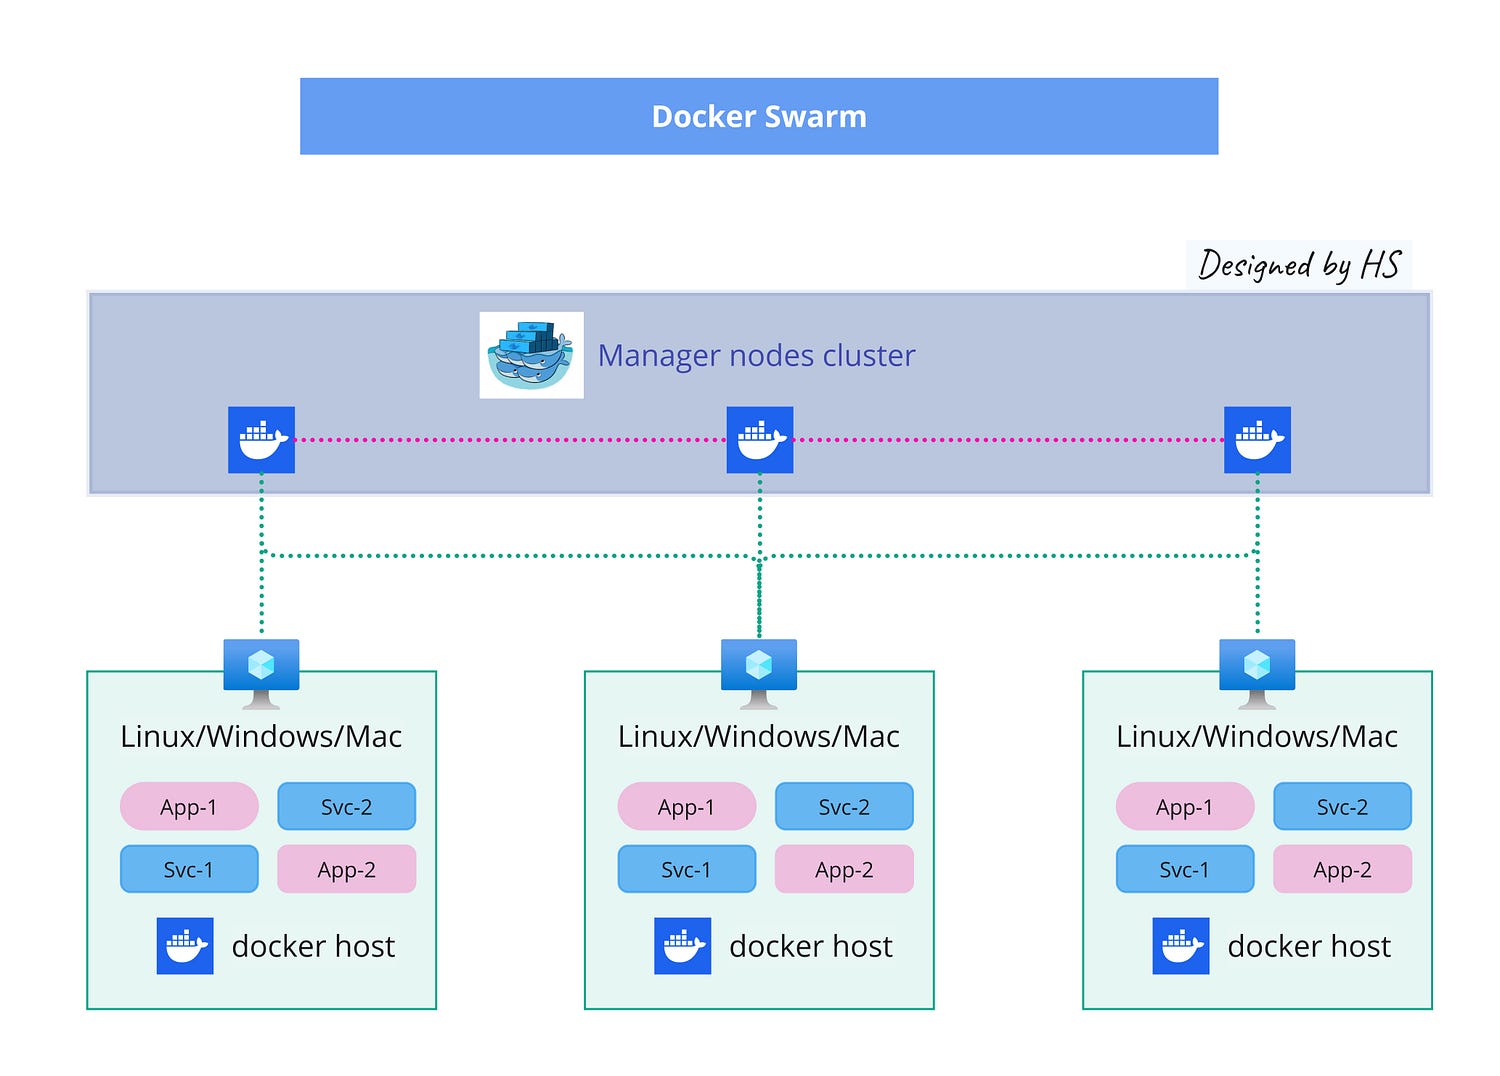
Docker Swarm
By its genesis, the Docker platform is built around the single host architecture. At a later point, Docker added their orchestration tool called Docker Swarm. Docker Swarm had its issues and didn’t get much traction and adoption by the community and the business.
They Can Work Together
Docker and Kubernetes are not mutually exclusive; they are often used together. Docker handles the creation and packaging of containers, while Kubernetes manages and orchestrates them at scale.
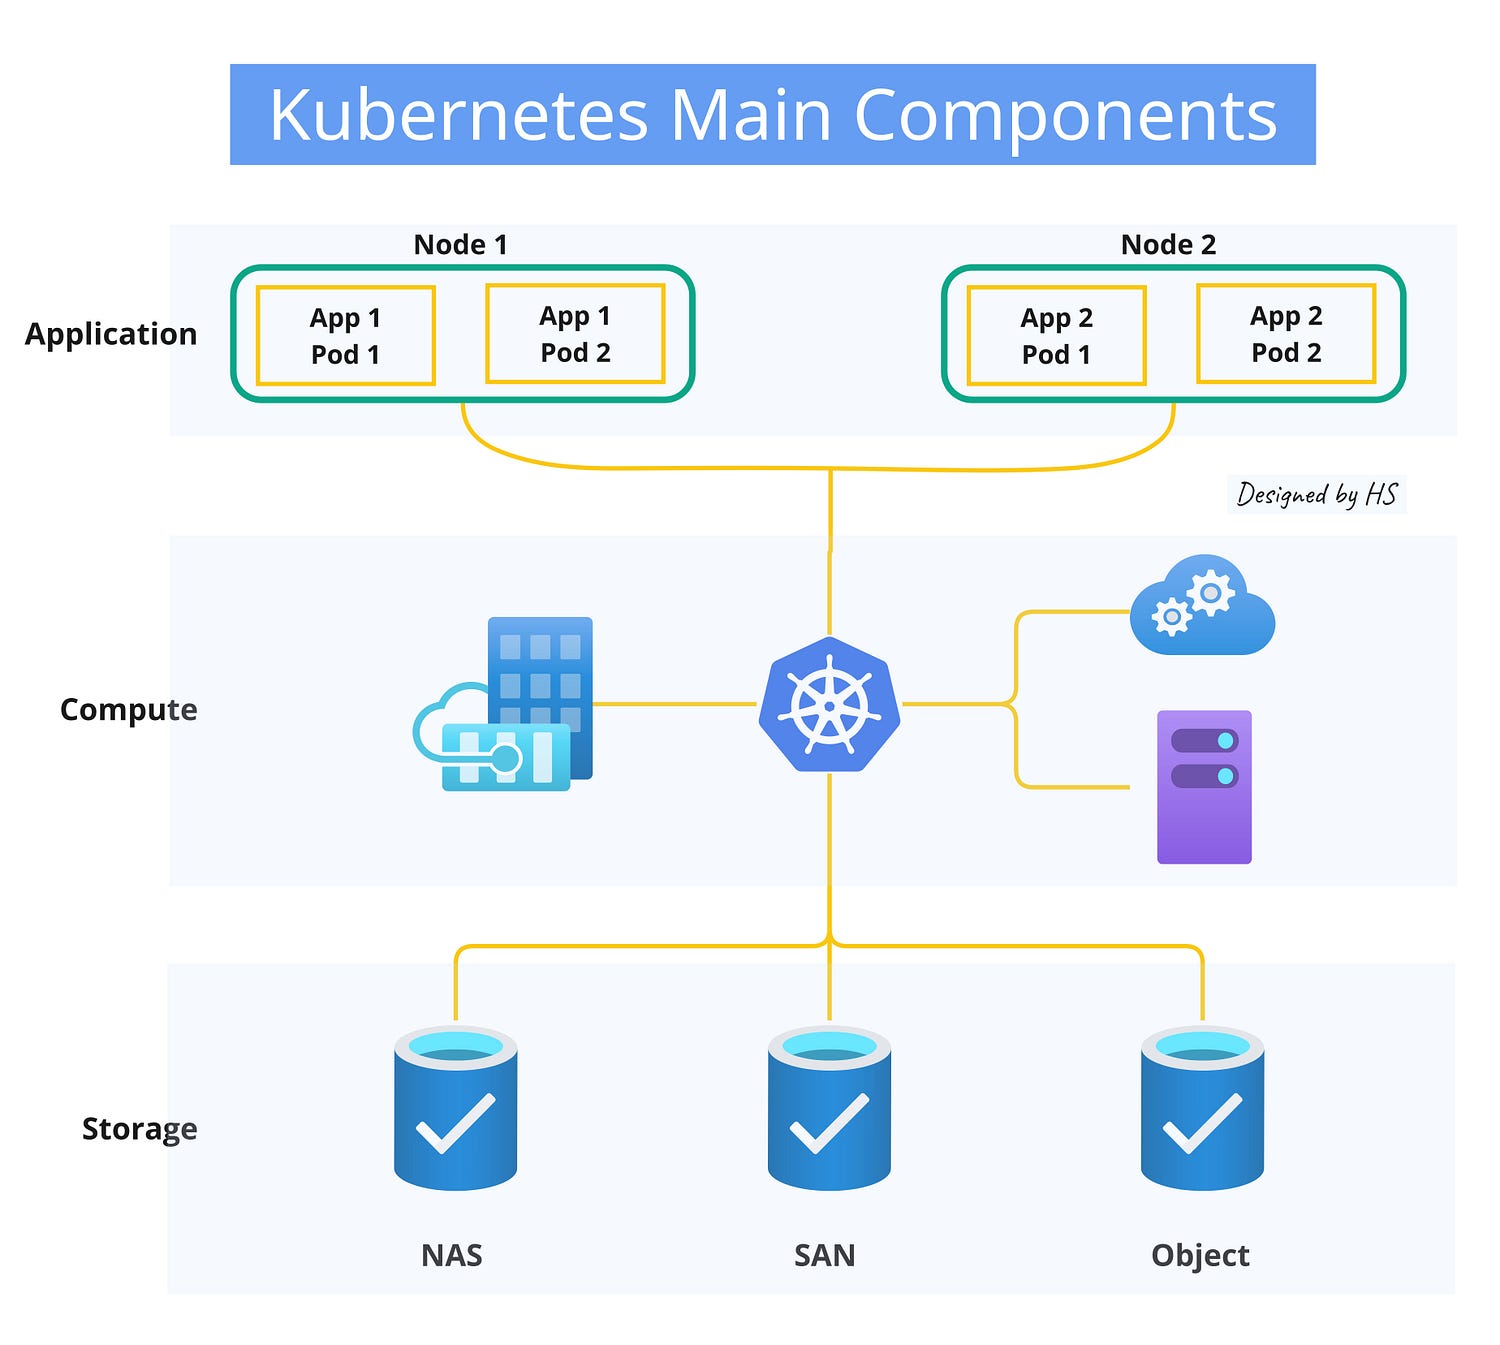
3. Kubernetes architecture
- The Cluster: The architecture of Kubernetes follows a primary/replica model. Its components are divided into two main categories: those that manage individual nodes and those that are part of the control plane.
- The API: Kubernetes uses building blocks called “primitives” to deploy, maintain, and scale applications based on CPU, memory, or custom metrics. These primitives make Kubernetes flexible and adaptable to different workloads. Both internal components and extensions rely on the Kubernetes API.
- The Objects: Kubernetes manages compute and storage resources by defining them as objects, which can then be controlled and managed efficiently.
Kubernetes Properties
- Service Discovery & Load Balancing: Exposes containers using DNS names or IP addresses and balances traffic.
- Storage Orchestration: Automatically mounts various storage systems.
- Automated Rollouts & Rollbacks: Manages updates to match the desired state.
- Automatic Bin Packing: Efficiently schedules containers based on resources.
- Self-Healing: Restarts, replaces, and removes failed containers.
- Secret & Configuration Management: Securely stores and manages sensitive information.
Kubernetes Desired State
In Kubernetes, the desired state is a declarative specification of how you want your system to function. It’s essentially a blueprint that defines the ideal configuration and behavior of your applications and infrastructure.
- Declarative Configuration: Define the desired state using YAML or JSON files, including replicas, resource limits, and network policies.
- Control Loops: Continuously monitor and reconcile the current state with the desired state.
- Self-Healing: Automatically restore the desired state by restarting or rescheduling pods if they fail.
- Scalability: Easily scale applications by adjusting the desired state, prompting Kubernetes to create or remove pods as needed.
Manifest files
A Kubernetes Manifest file (also called a configuration file, or definition file) is a YAML or JSON file that outlines the desired state of a Kubernetes object. These objects can be anything from deployments and replicasets to services and more. The manifest file specifies the object’s details, including its metadata, properties, and the state you want it to achieve.
An example of a manifest file for deployment:
apiVersion: apps/v1
kind: Deployment
metadata:
  name: nginx-deployment
spec:
  replicas: 3
  template:
    spec:
      containers:
      - name: nginx
        image: nginx:1.14.2
        ports:
        - containerPort: 80
Ephemeral, Idempotent, and Immutable
Ephemeral: In Kubernetes, containers and pods are considered ephemeral. This means they can be terminated and recreated at any time, often without warning.
Because pods are ephemeral, you cannot rely on their local state. Anything stored within a pod’s filesystem will be lost when the pod is terminated.
Immutable: Immutable means that something cannot be changed after it is created.
Certain Kubernetes objects are immutable, most notably Pods. Once a pod is created, you cannot change its fundamental characteristics (e.g., the containers it runs, and the volumes it mounts). If you need to change a pod, you must create a new pod (often through a deployment update, which handles the creation of the new pod and the termination of the old one).
When you update a deployment (which manages pods), Kubernetes creates new pods with the updated configuration and then terminates the old pods.
Idempotent: An operation is idempotent if it can be performed multiple times with the same result as performing it once. In Kubernetes, this is crucial for managing resources.
Scaling a deployment to 3 replicas should result in 3 running pods, regardless of how many times you issue the scale command. The scale operation is idempotent.
Kubernetes APIs are designed to be idempotent. You can apply the same YAML file multiple times, and it will only create or update resources as needed
Relationship between the concepts:
- Ephemeral & Immutable: The fact that pods are ephemeral reinforces the principle of immutability. Since pods can be recreated at any time, it wouldn’t make sense to allow in-place updates. The ephemeral nature of pods necessitates an immutable approach.
- Idempotent: Idempotency is essential for managing ephemeral and immutable objects. Kubernetes needs to perform operations like scaling and updates reliably, even if those operations are triggered multiple times due to the dynamic nature of the cluster.
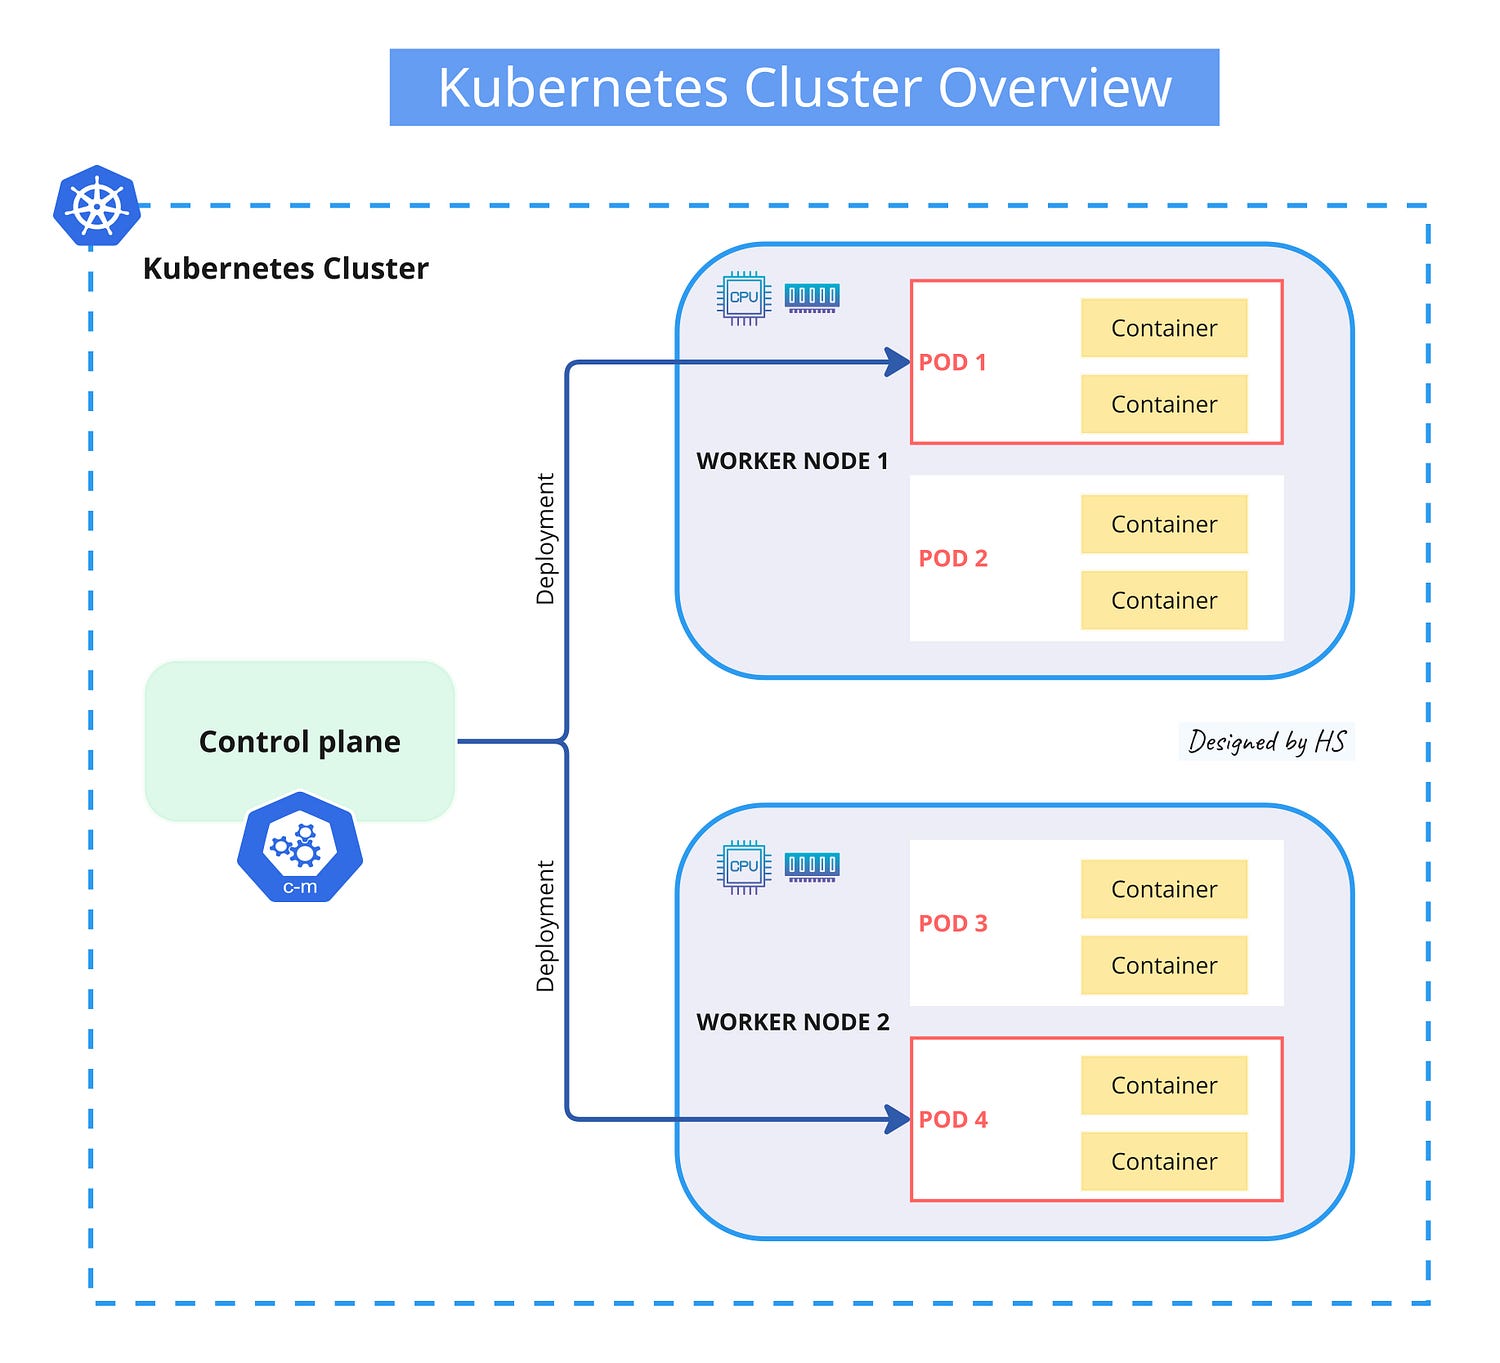
4. The Cluster
Kubernetes cluster consists of two main components:
- Control Plane: This is the brain of the cluster. It manages the overall state of the cluster, including scheduling applications, maintaining their desired state, scaling, and rolling out updates.
- Worker Nodes: These are the machines (physical or virtual) that run the containerized applications.
Nodes
A node is the smallest unit in a Kubernetes cluster, representing a single machine. It can be a physical machine in a data center or a virtual machine in the cloud.
By treating machines as “nodes,” we focus on their CPU and RAM resources rather than specific properties. This allows any machine to replace another, making the system flexible and efficient. Nodes pool their resources, forming a powerful system. Kubernetes distributes workloads across nodes and adjusts automatically when nodes are added or removed, so neither the program nor the programmer needs to worry about specific machines.
Persistent Volumes
In Kubernetes, programs can move between nodes, so data can’t be saved just anywhere. Local storage is temporary, and data saved locally won’t persist if the program moves to a new node.
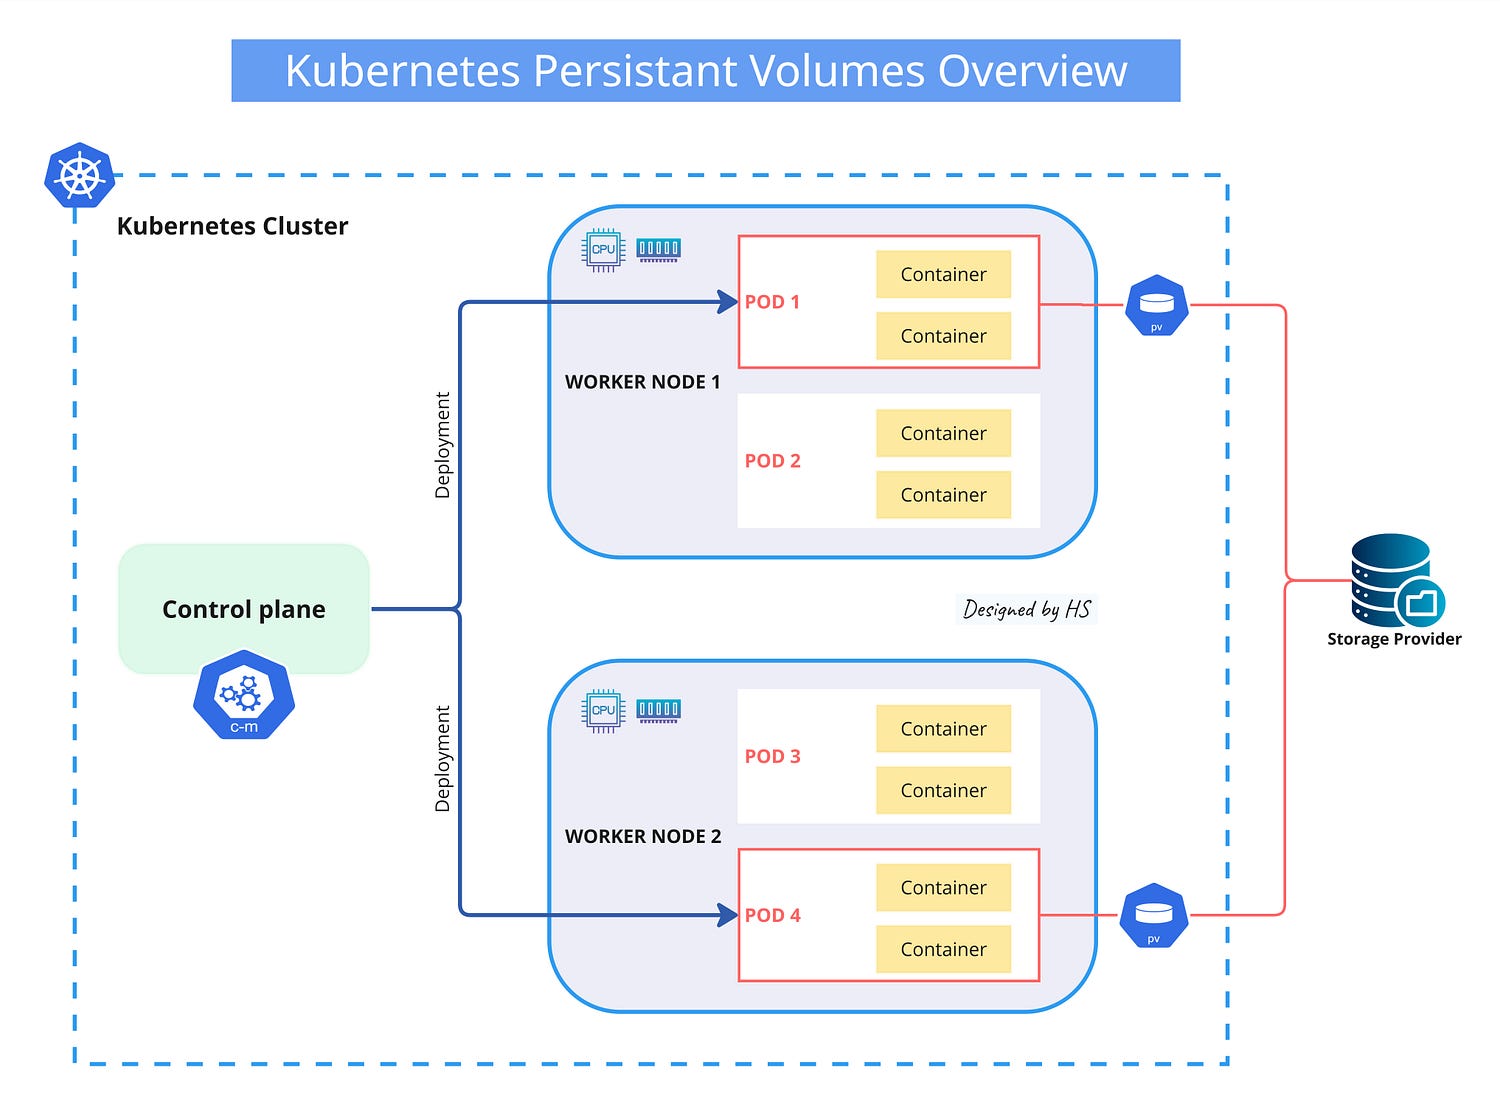
Kubernetes uses Persistent Volumes to store data permanently. These are like external hard drives (local or cloud drives) attached to the cluster, providing a file system that isn’t tied to any specific node (unlike CPU and RAM).
NOTE: More on Persistent Volumes, Storage Classes, and Persistent Volume Claims down below.
5. Control Plane node
This is the brain of the cluster. It manages the overall state of the cluster, including scheduling applications, maintaining their desired state, scaling, and rolling out updates.

Etcd
ETCD is a key-value store that Kubernetes uses to keep track of all the cluster data. It ensures that the cluster’s state is consistent and up-to-date.
What is ETCD?
ETCD monitors the nodes in a Kubernetes cluster to see which resources are available. It helps the control plane assign tasks to the right resources.
- Node Monitoring: ETCD regularly checks the health of all nodes. If a node is overloaded or underused, ETCD has the data to help the control plane reassign tasks or delete the node.
- Resource Management: It implements mechanisms to avoid resource starvation and ensure services are available and reliable.
- Synchronization and Interaction: ETCD’s features like shared configuration, service discovery, leader election, distributed locks, and the watch API help improve communication and synchronization among components and services.
API server
The Kubernetes API is the main way users interact with their Kubernetes cluster.
The Kubernetes API is the front end of the control plane. It checks if requests are valid and processes them, allowing users to manage, create, and configure their clusters.
Key Functions:
- User Interaction: It’s how users, external components, and parts of the cluster communicate.
- Central Role: The API server and its HTTP API are at the center of the control plane, letting you query and change the state of Kubernetes objects. The API server handles REST operations and maintains the cluster’s shared state.
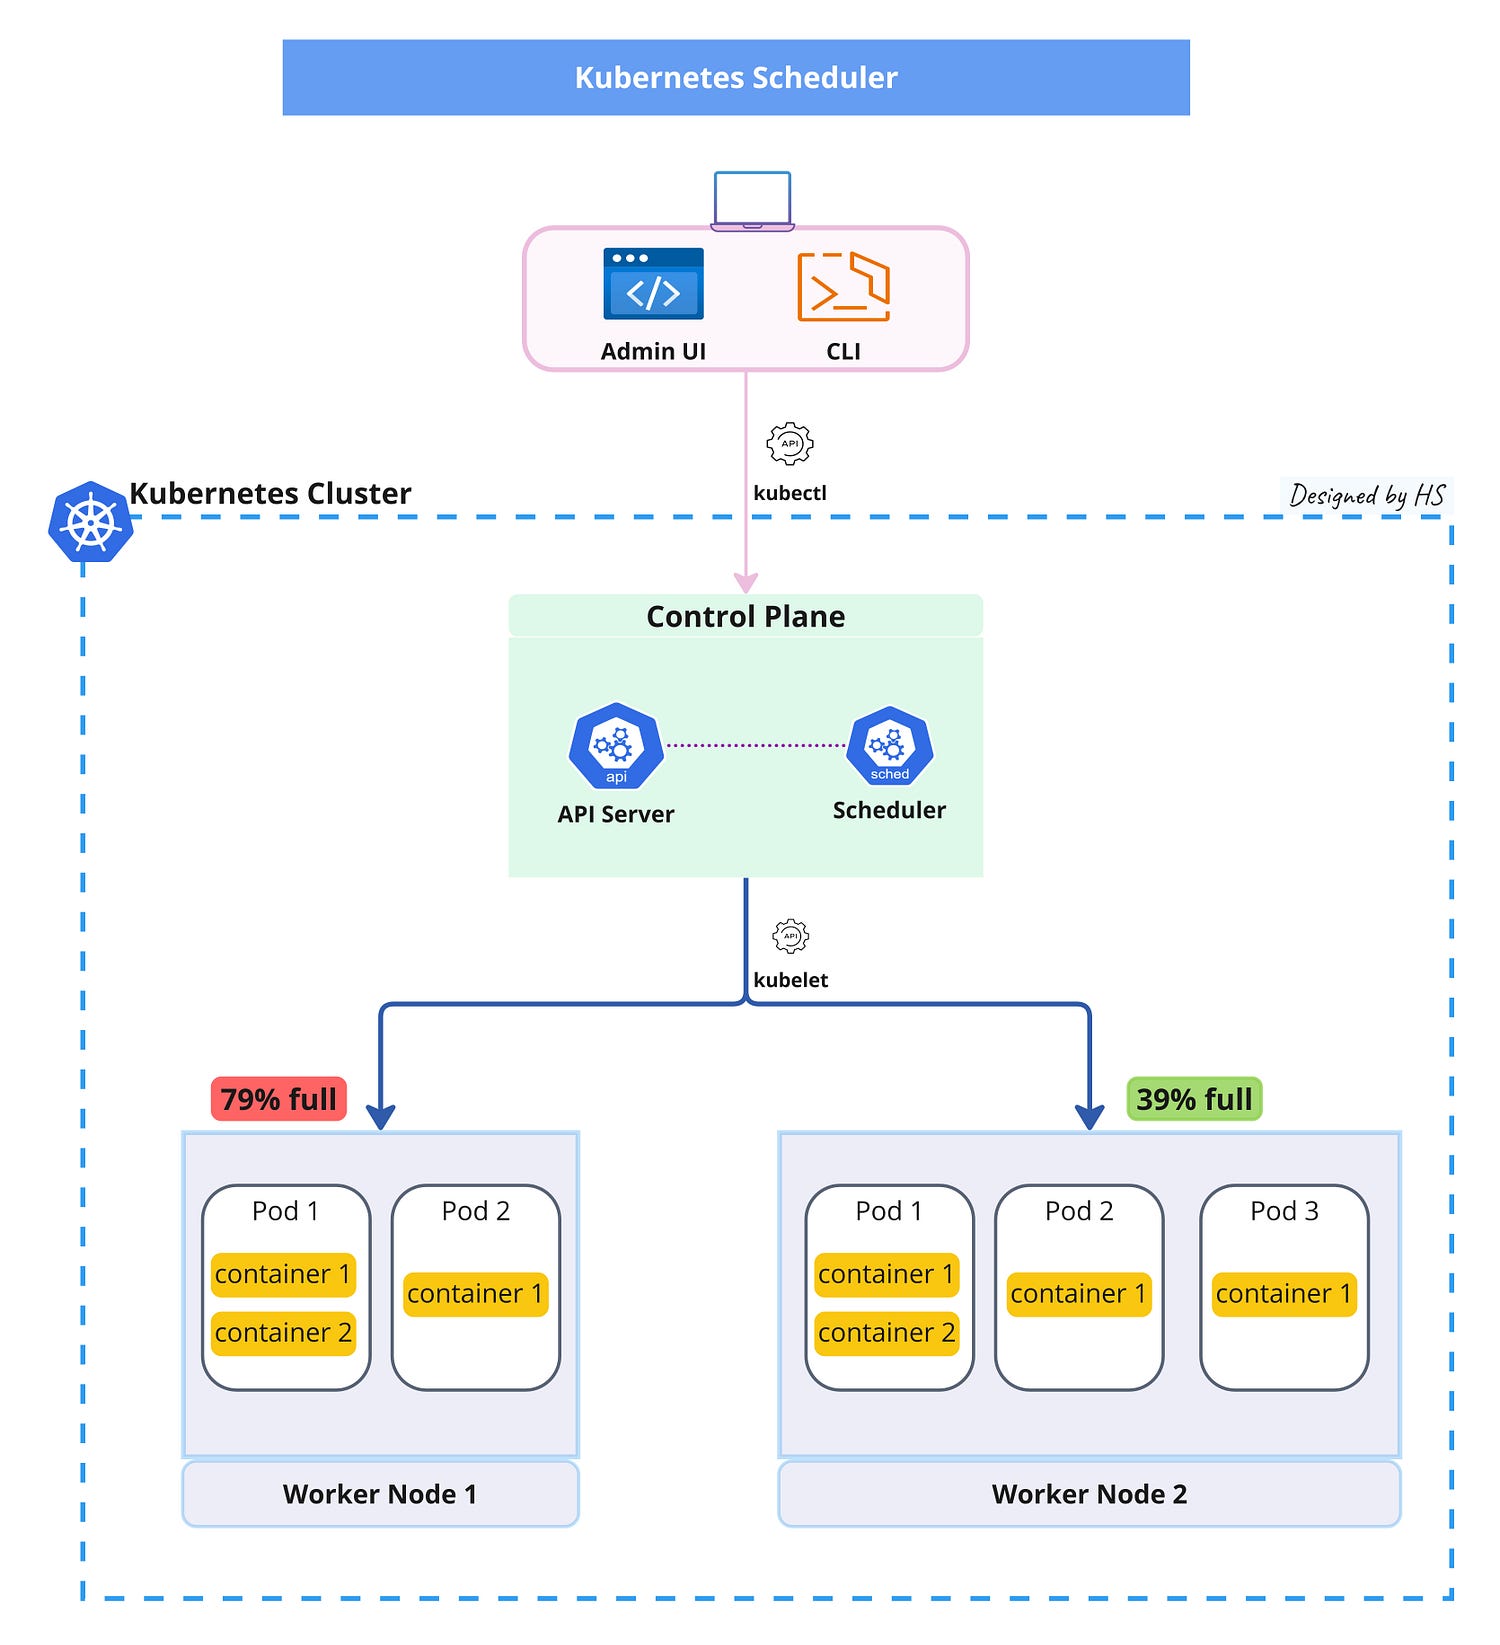
Scheduler
The Kubernetes Scheduler is responsible for assigning pods to nodes in a cluster.
The Kubernetes Scheduler decides which node in the cluster should run a new pod based on available resources and specific requirements.
Key Functions:
- Pod Assignment: It finds the best node for each new pod, ensuring efficient use of resources.
- Node Monitoring: The scheduler checks nodes’ health and resource availability to make informed decisions.
- Scoring and Filtering: It filters out unsuitable nodes and scores the remaining ones to pick the best option for the pod.
Controller Manager and Controllers
The Controller Manager in Kubernetes runs core control loops to maintain the cluster’s desired state. It manages various controllers, ensuring the cluster operates smoothly.
The Kubernetes Controller Manager runs various controllers to manage the state of your cluster. The Kubernetes Controller Manager is like the conductor of an orchestra, ensuring all parts of the cluster work in harmony. It runs continuous control loops to keep the cluster’s state as desired.
Key Functions
- Control Loops: It runs control loops that watch the state of the cluster and make changes to move the current state towards the desired state.
- Multiple Controllers: It includes controllers for tasks like replication, endpoint management, namespace management, and service accounts.
- Cluster Management: It helps maintain the overall health and efficiency of the cluster by managing resources and ensuring everything is running smoothly.
Kubernetes Controllers: Controllers are essential for maintaining the health and efficiency of your Kubernetes cluster. As we mentioned there are different types of controllers all managed by Controller Manager.
6. How to interact with the Kubernetes cluster
There are several ways to interact with a Kubernetes cluster:
kubectl: Essential for day-to-day interaction with your cluster. You’ll use it for most tasks.- Kubernetes Dashboard: Useful for getting a visual overview and performing simple tasks.
- Client Libraries: For programmatic access and automation.
- Cloud Provider Tools: For simplified management within a specific cloud environment.
- Operators: For managing complex, stateful applications.
kubectl
Installation: kubectl needs to be installed on your local machine. You can download it from the official Kubernetes website or use package managers like apt, yum, or brew.
Configuration (kubeconfig)
kubectl uses a configuration file, usually named config (or kubeconfig), to connect to your cluster. This file contains information like the cluster’s API server address, authentication credentials, and default namespace. You typically get this file from your cluster administrator or cloud provider. It’s often located at ~/.kube/config.
Basic Commands
Here are some essential kubectl commands:
kubectl get nodes: Lists all nodes in the cluster.
kubectl get pods: Lists all pods in the default namespace.
kubectl get deployments: Lists all deployments.
kubectl get services: Lists all services.
kubectl describe pod <pod-name>: Shows detailed information about a specific pod.
kubectl logs <pod-name>: Shows logs from a pod.
kubectl exec -it <pod-name> -- bash: Opens a shell inside a pod.
kubectl create -f <filename.yaml>: Creates resources from a YAML file.
kubectl apply -f <filename.yaml>: Creates or updates resources from a YAML file (recommended for managing resources).
kubectl delete -f <filename.yaml>: Deletes resources from a YAML file.
Contexts
If you have access to multiple clusters, you can use contexts to switch between them. kubectl config get-contexts lists available contexts, and kubectl config use-context <context-name> switches to a specific context.
Namespaces: Namespaces are used to logically divide a cluster. kubectl get pods -n <namespace-name> lists pods in a specific namespace. You can set a default namespace using kubectl config set-context --current --namespace=<namespace-name>.
7. Worker node
Worker nodes are the machines (physical or virtual) that run the containerized applications.
For a node to function properly within a cluster, it needs to run a container runtime. Additionally, certain components must be installed to ensure they can communicate effectively with the main network configuration of these containers.

The kubelet
It’s the primary “node agent” that runs on each node in the cluster.
The kubelet is responsible for making sure that containers are running in a pod. It takes a set of PodSpecs (which are YAML or JSON objects that describe a pod) and ensures that the containers described in those PodSpecs are running and healthy. The kubelet communicates with the Kubernetes control plane to register the node and report on the status of the pods running on it. More about pods down below.
- Pod Management: The kubelet continuously monitors the state of pods on its node. If a pod is not running as expected, the kubelet will attempt to restart it.
- Node Registration: The kubelet registers its node with the Kubernetes control plane, providing information about the node’s capacity and status. This helps the control plane make scheduling decisions.
- Health Checks: The kubelet performs regular health checks on the pods and containers running on its node. It uses liveness and readiness probes defined in the PodSpecs to determine if a container is healthy and ready to serve traffic.
- Container Runtime Interface (CRI): The kubelet interacts with the container runtime (such as Docker or containerd) to manage the lifecycle of containers. It ensures that the containers are started, stopped, and removed as needed.
- Resource Management: The kubelet monitors the resource usage (CPU, memory, etc.) of the pods and containers on its node. It ensures that the resource limits and requests specified in the PodSpecs are respected.
Kubernetes Container Runtime Engine
A container runtime is software that executes containers and manages their lifecycle on a node.
In Kubernetes, each node in the cluster must have a container runtime installed to run the pods. The container runtime interfaces with the kubelet through the Container Runtime Interface (CRI), ensuring seamless communication and management of containers.

Common Container Runtimes
- containerd: A lightweight and efficient runtime that is widely used in production environments. A popular choice for modern cloud-native applications.
- CRI-O: A runtime specifically designed for Kubernetes, for running Open Container Initiative (OCI) containers.
- Docker Engine: Although Docker was initially the default runtime for Kubernetes, it has been deprecated in favor of ContainerD and CRI-O. Kubernetes no longer includes direct integration with Docker as of version 1.24.
Container Runtime Responsibilities
- Container Lifecycle Management: Starts, stops, and removes containers as needed.
- Image Management: Pulls images from registries, caches them, and manages storage.
- Resource Isolation: Keeps containers separate from each other and the host system.
- Networking: Enables communication between containers and external services.
- Logging and Monitoring: Gathers data for monitoring and troubleshooting.
The kube-proxy
The kube-proxy is a network proxy that runs on each node in a Kubernetes cluster. It maintains network rules and facilitates communication between services and pods.
- Service Discovery: Watches the control plane for changes in Service and EndpointSlice objects to configure network rules.
- Traffic Routing: Routes traffic using different methods: iptables, IPVS, or Userspace mode.
- Load Balancing: Distributes traffic across pods to maintain performance and reliability.
- Network Rules Management: Synchronizes network rules on each node, updating them as needed to reflect changes in the cluster.
8. Namespaces
A Kubernetes namespace is a way to divide cluster resources between multiple users or teams, providing a scope for names and a mechanism to attach authorization and policy to a subsection of the cluster.

Namespaces in Kubernetes help organize and manage resources within a cluster. They allow different projects, teams, or customers to share a Kubernetes cluster without interfering with each other.
- Isolation: Isolates groups of resources within a cluster, logically separating them.
- Resource Management: Applies resource quotas to limit CPU and memory usage.
- Access Control: Uses RBAC policies to ensure only authorized users can access resources.
- Unique Naming: Allows the same resource name in different namespaces without conflict.
Kubernetes starts with four initial namespaces
- default: The default namespace for resources with no other namespace specified.
- kube-system: For resources created by the Kubernetes system.
- kube-public: A special namespace readable by all users, including those not authenticated.
- kube-node-lease: Contains lease objects associated with each node, used for node heartbeat.
9. Pods
A Kubernetes pod is the smallest deployable unit in Kubernetes, representing a single instance of a running process in your cluster.

A pod is a group of one or more containers that share storage, network resources, and a specification for how to run the containers. Think of a pod as a logical host for your application, where containers within the pod can easily communicate and share data.
- Single or Multiple Containers: Pods can run one or more containers, sharing network settings for easy communication.
- Shared Storage: Containers in a pod can share storage volumes for data persistence and file sharing.
- Networking: Each pod has a unique IP address within the cluster for communication with other pods and services.
- Lifecycle Management: Kubernetes manages pod creation, scheduling, replication, scaling, and updates.
- Ephemeral Nature: Pods are temporary; if one fails, Kubernetes replaces them to maintain high availability and resilience.
10. Kubernetes Workloads
Kubernetes offers several high-level abstractions over simple pods, making it easier to manage workloads. These abstractions allow users to define and manage their applications declaratively.
Kubernetes workload controllers:
- Deployments: Automate the management of applications, including updates, scaling, and rollbacks.
- ReplicaSets: Ensure a specified number of pod replicas are running at all times.
- StatefulSets: Manage stateful applications, providing stable network identities and persistent storage.
- DaemonSets: Ensure that a copy of a pod runs on all (or some) nodes in the cluster.
- Jobs and CronJobs: Manage batch and scheduled tasks, respectively.
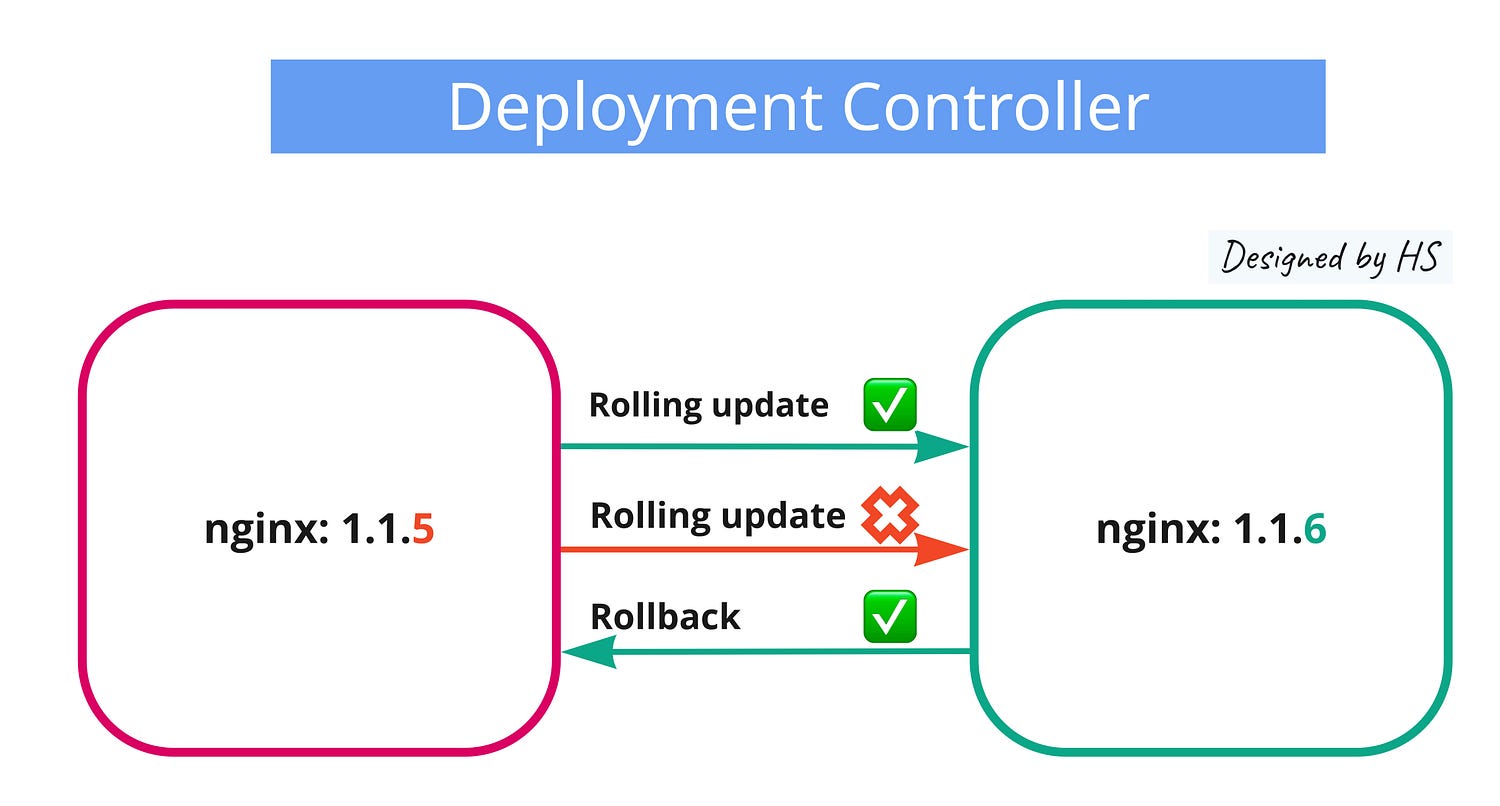
Deployment Controller
Deployment controller is the best way to provision and manage workloads in Kubernetes. Deployments = stateless applications.
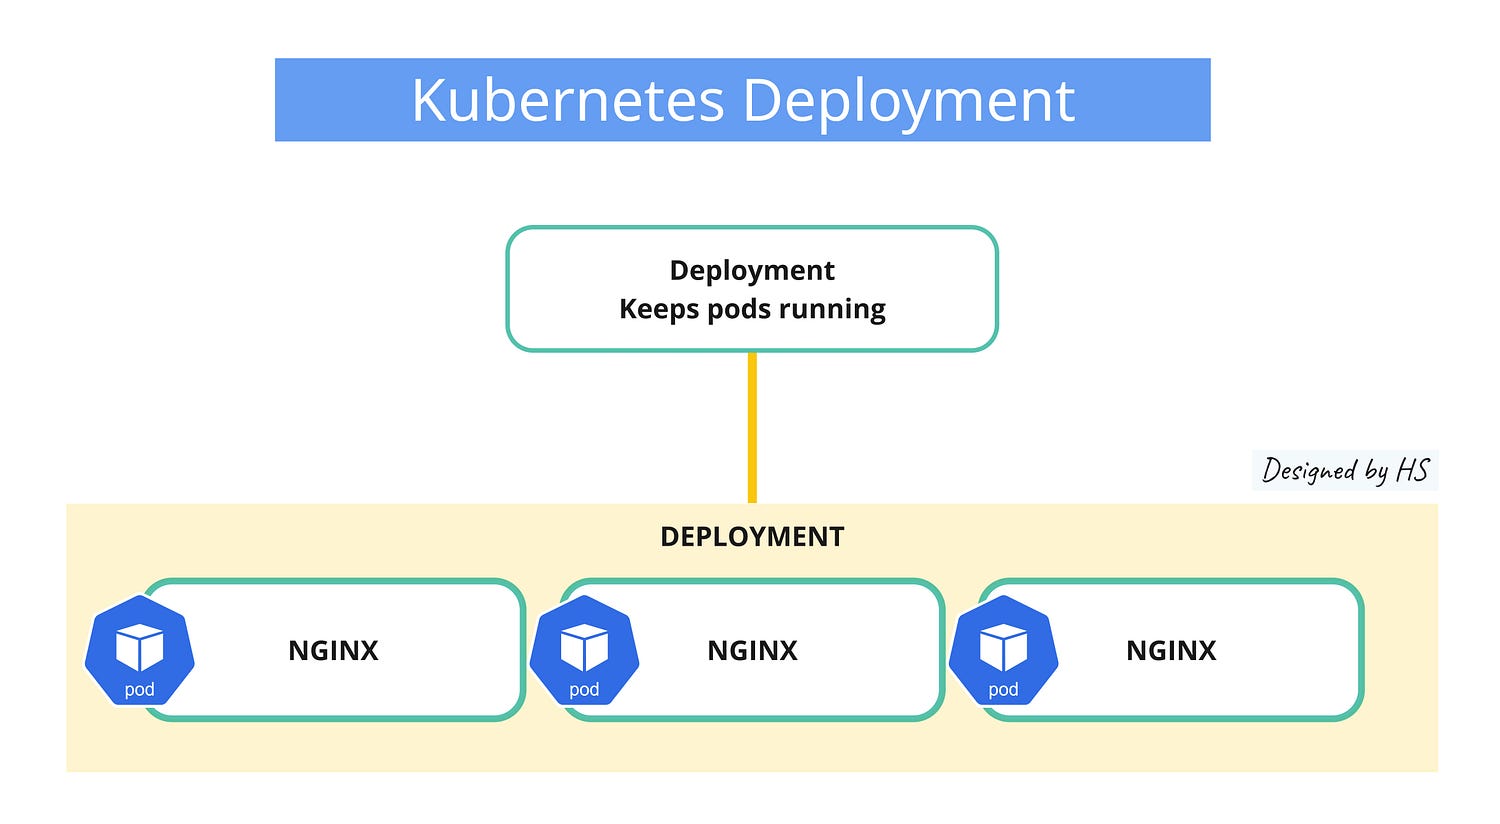
A Kubernetes deployment automates application management, ensuring the desired number of pods are running.
- Declarative Updates: Specify the desired state, and Kubernetes ensures it matches.
- ReplicaSets: Manage pod replicas to maintain the desired count.
- Rolling Updates: Update applications without downtime by gradually replacing pods.
- Rollback: Easily revert to a previous version if needed.
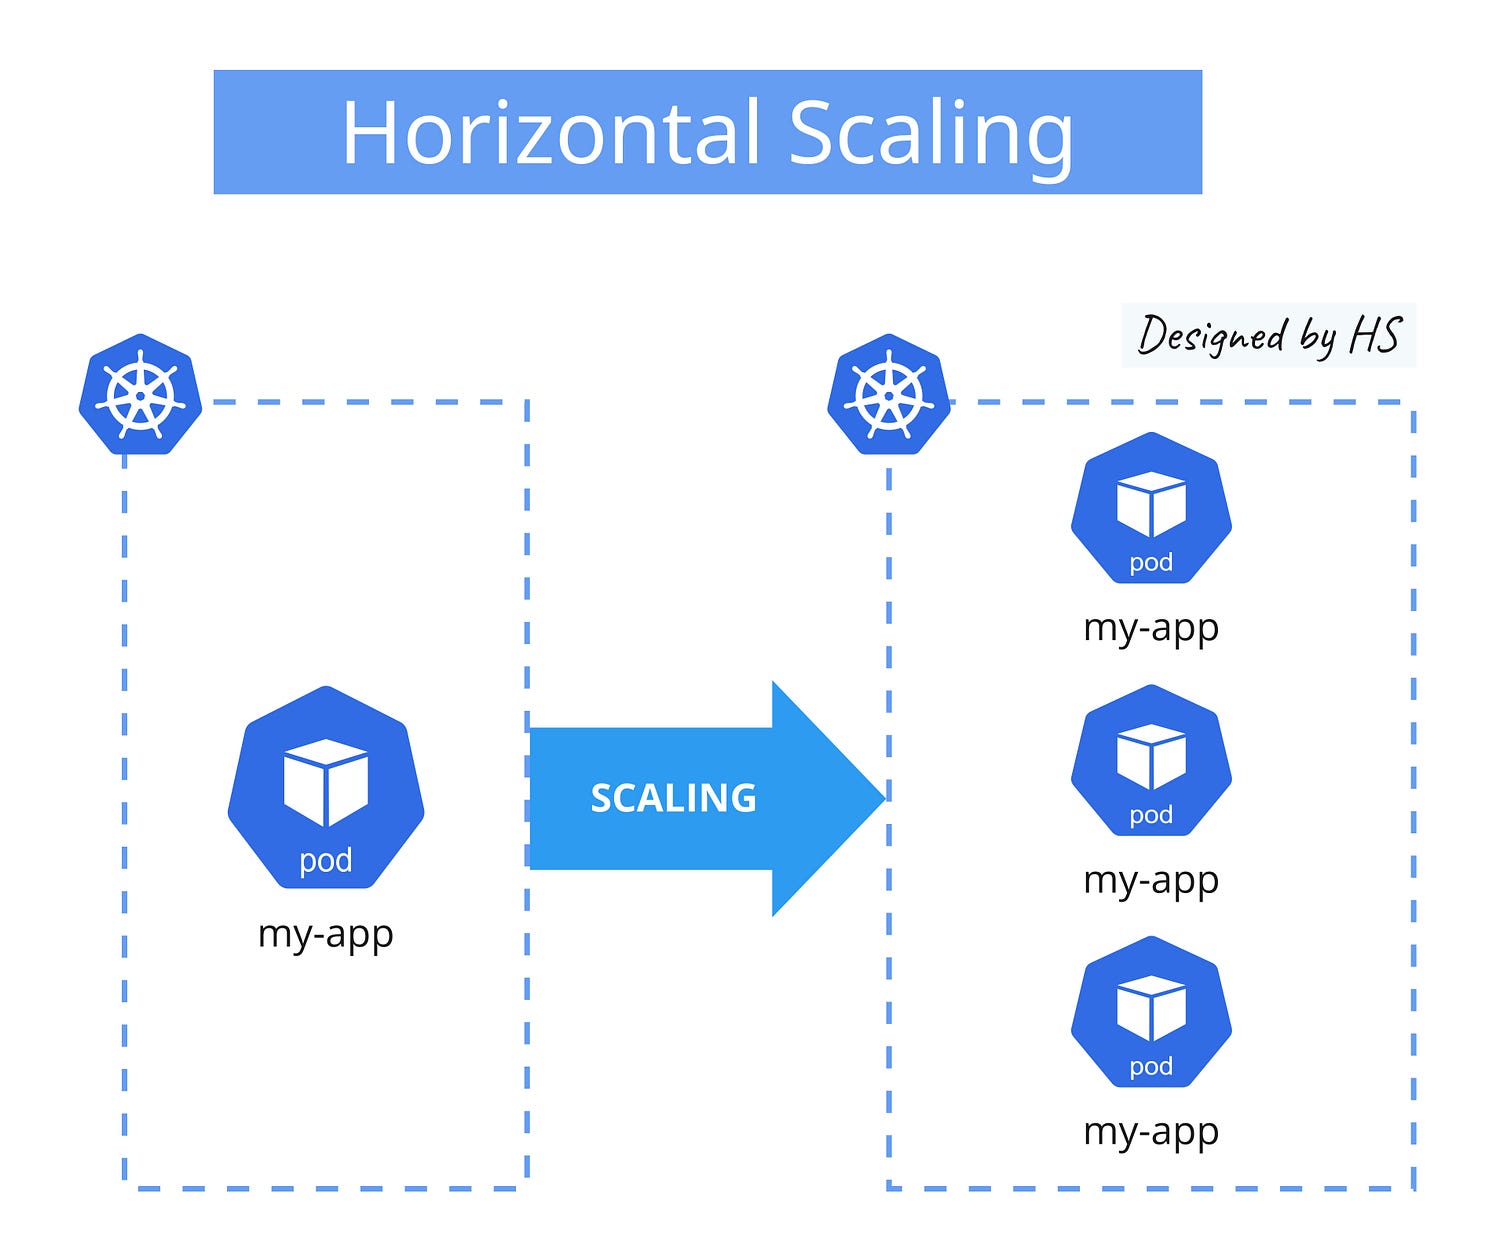
Scaling: Adjust the number of replicas to scale your application.
Manifest example
As we mentioned, Kubernetes is based on objects, resources, and different services, such as a Deployment controller for managing workloads (applications) in an automated manner and following the desired state philosophy and configuration.
To create a workload in Kubernetes by using a Deployment controller, which is the best practice, we need to create a deployment.yaml config file as the example below:
apiVersion: apps/v1
kind: Deployment
metadata:
  name: my-deployment
spec:
  replicas: 3
  selector:
    matchLabels:
      app: my-app
  template:
    metadata:
      labels:
        app: my-app
    spec:
      containers:
      - name: my-container
        image: my-image:latest
        ports:
        - containerPort: 80
- apiVersion: Specifies the API version.
- kind: Defines the type of Kubernetes object (Deployment).
- metadata: Contains the name and labels for the deployment.
- spec: Describes the desired state of the deployment.
- replicas: Number of pod replicas.
- selector: Identifies the pods managed by this deployment.
- template: Defines the pod template used to create pods.
- metadata: Labels for the pods.
- spec: Specifies the container details (name, image, ports).
This configuration creates a deployment named my-deployment with three replicas of a pod running my-container from the my-image:latest image, exposing port 80.
Deployment process
A simple example of how the Deployment process in Kubernetes is working:
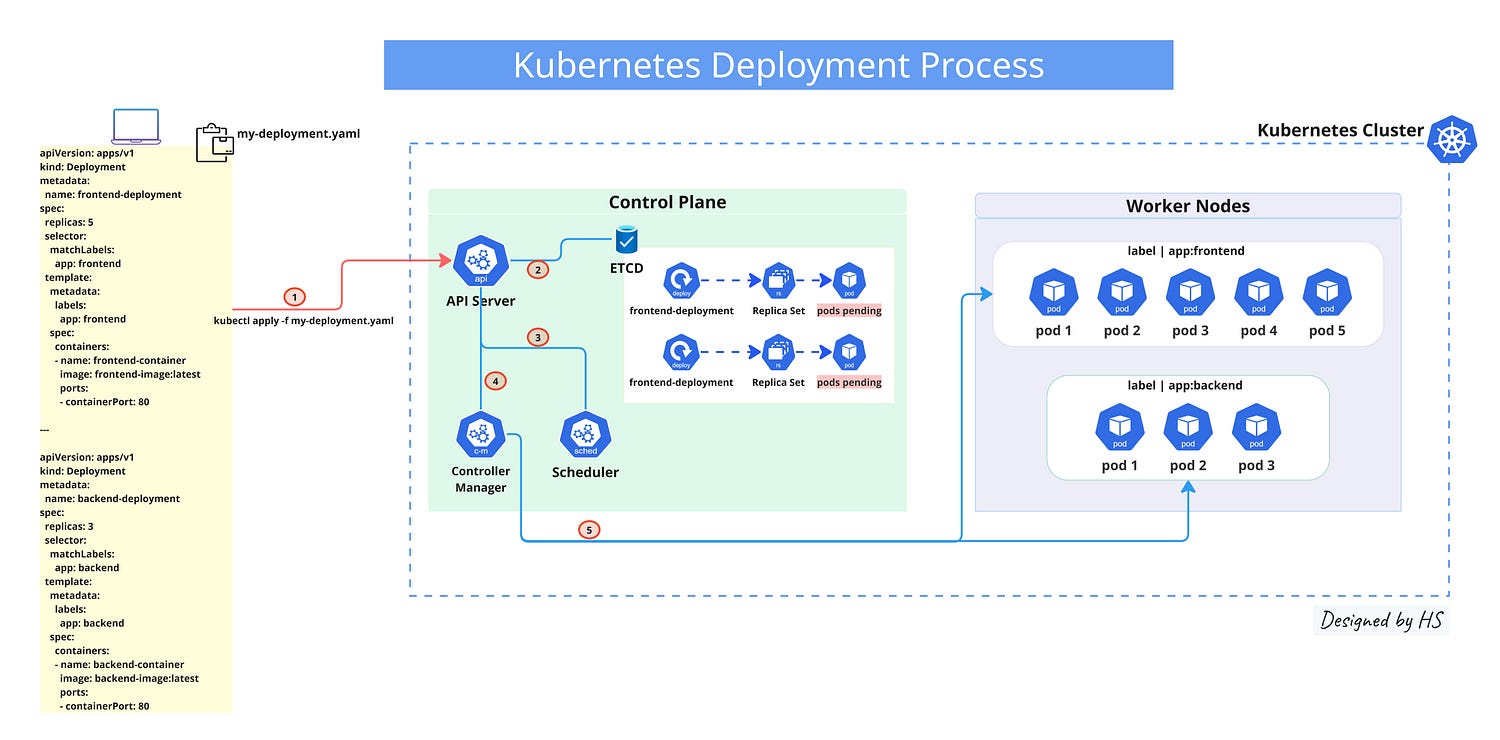
- When you use kubectl to submit a deployment, the API server gets your request.
- Stores the resource in etcd. At this stage, the pods are marked as “Pending” in etcd and haven’t been assigned to any node yet.
- Also added to the scheduler’s queue, ready to be assigned.
- The controller Manager receives the call.
- Controller Manager proceeds and creates them (and the associated ReplicaSet).
This configuration creates two deployments: frontend-deployment with 5 replicas and backend-deployment with 3 replicas, each exposing port 80.
ReplicaSet Controller
A Kubernetes ReplicaSet ensures that a specified number of pod replicas are running at any given time.
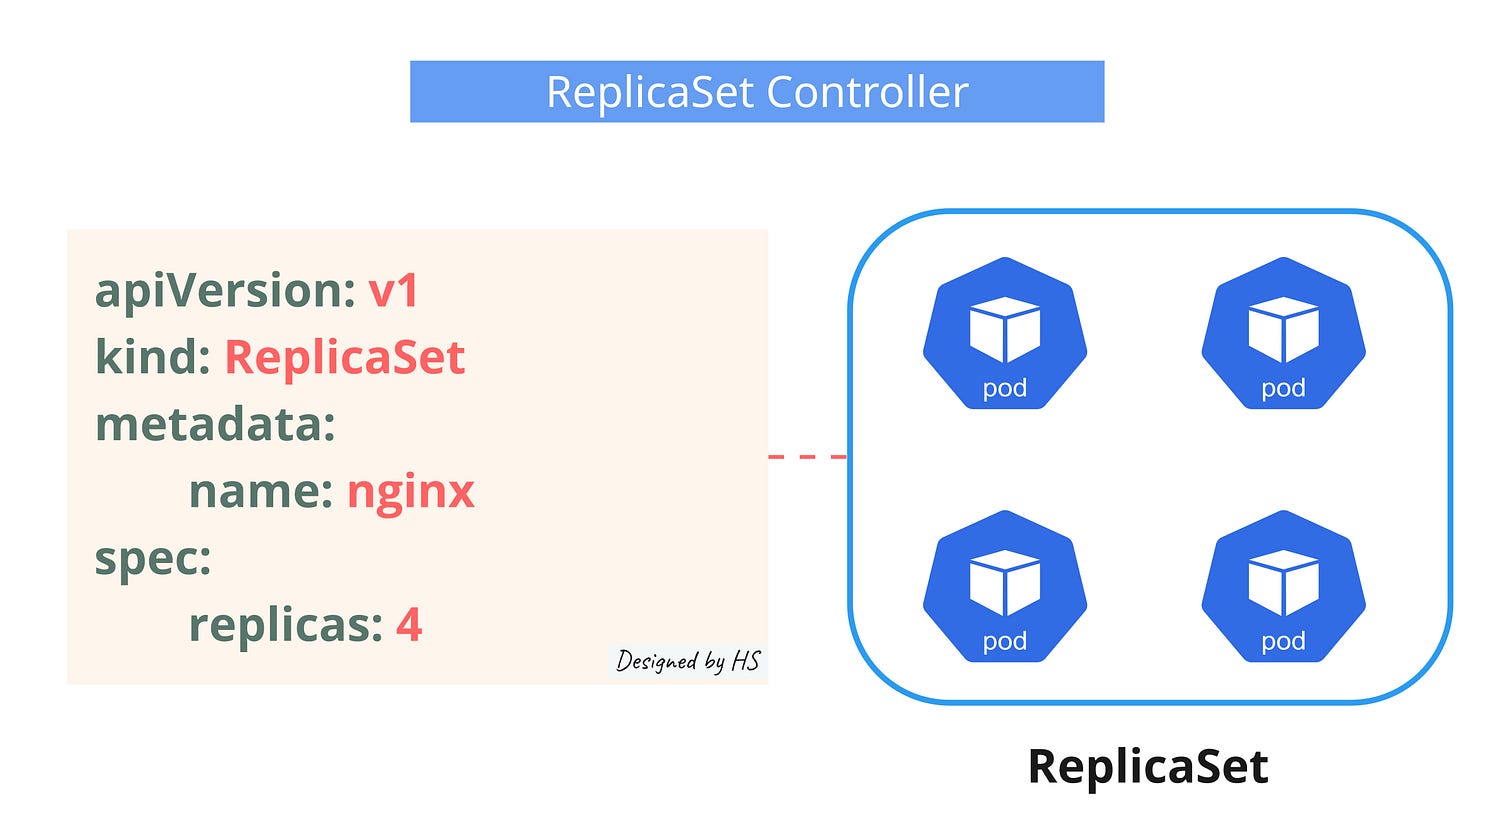
- Pod Management: It maintains the desired number of pods, creating new ones if any fail or are deleted.
- Scaling: You can scale the number of pods up or down by adjusting the replica count.
- Selector: It uses a selector to identify which pods to manage.
For most use cases, it’s recommended to use Deployments instead, as they offer more features and flexibility.
ReplicationController
For most use cases, it’s recommended to use Deployments instead, as they offer more features and flexibility.
StatefulSets Controller
A StatefulSet in Kubernetes is a powerful tool for managing stateful applications. Unlike Deployments, which are used for stateless applications, StatefulSets are designed to handle applications that require stable, persistent storage and unique network identifiers.
- Stable Network IDs: Each pod in a StatefulSet gets a unique, stable network identity. This is crucial for applications that need to be consistently reachable.
- Persistent Storage: Pods in a StatefulSet can have persistent storage, which means their data remains intact even if the pod is rescheduled.
- Ordered Deployment and Scaling: StatefulSets ensure that pods are created, deleted, and scaled in a specific order. This is important for applications that need to start up or shut down in a particular sequence.

For example, if you’re running a database cluster, you might use a StatefulSet to ensure each database instance has a stable identity and persistent storage.
NOTE: Generally, always go for dedicated database instances, such as PaaS DB’s from cloud providers.
11. Services
In Kubernetes, a Service is an abstraction that defines a logical set of pods and a policy by which to access them. Services enable you to expose your applications running in pods to other applications or users, both inside and outside your cluster.
Stable Network Endpoint
Services provide a stable IP address or DNS name for a set of pods, even as the pods are created and destroyed.
Selectors
Services use label selectors to identify the pods they should route traffic. This decouples the Service from the specific pods, allowing for dynamic scaling and updates.
Service Discovery
Kubernetes provides built-in service discovery mechanisms, such as DNS and environment variables, to help applications find and communicate with each other.
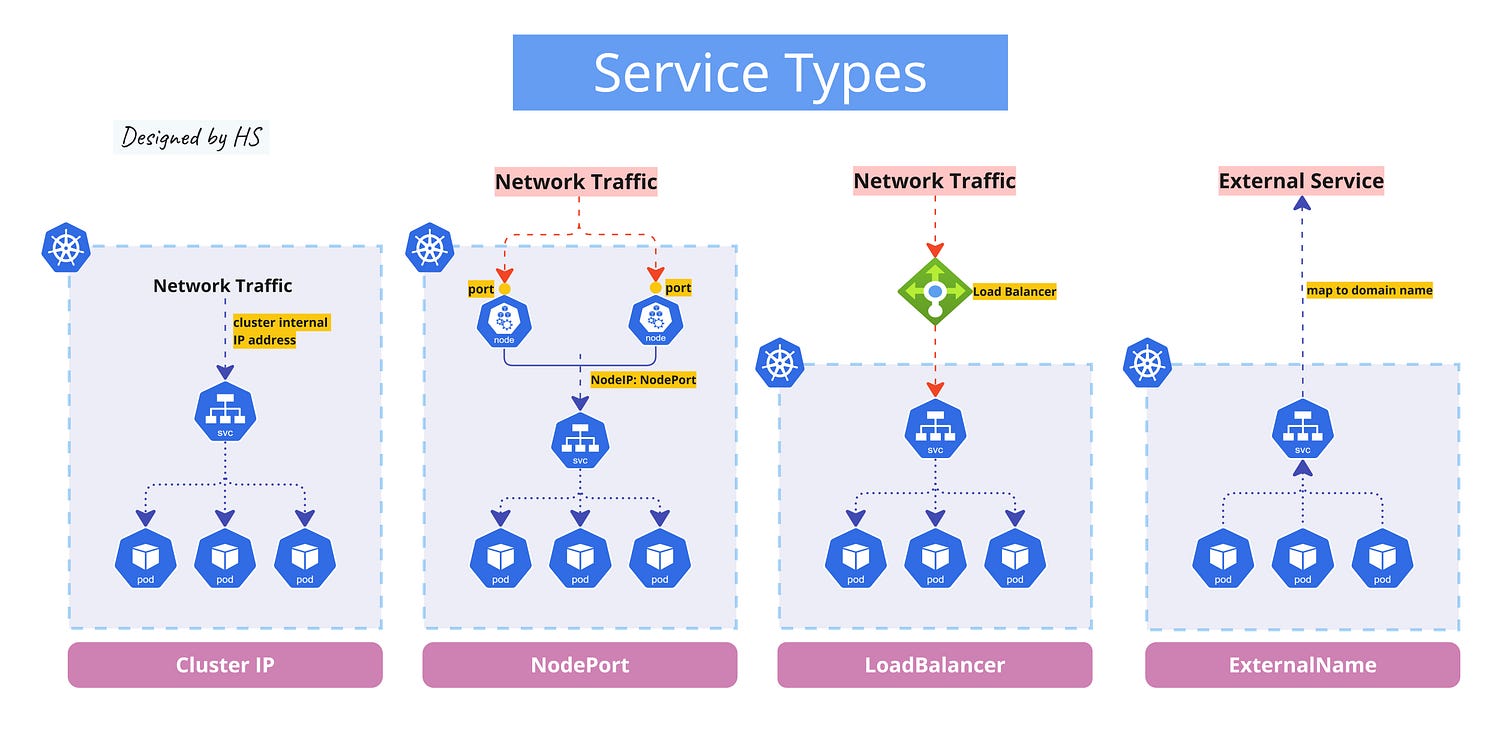
Service Types
There are several types of Services, each suited for different use cases:
- ClusterIP: Exposes the Service on an internal IP within the cluster. This is the default type and is used for communication between services within the cluster.
- NodePort: Exposes the Service on each node’s IP at a static port. This allows external traffic to access the Service.
- LoadBalancer: Exposes the Service externally using a cloud provider’s load balancer.
- ExternalName: Maps the Service to the contents of the externalName field (e.g., my-app.example.com), allowing you to proxy to an external service.
Manifest example
apiVersion: v1
kind: Service
metadata:
  name: my-web-service
spec:
  selector:
    app: my-web-app
  ports:
    - protocol: TCP
      port: 80
      targetPort: 8080
  type: ClusterIP
- apiVersion: Specifies the API version.
- kind: Defines the type of Kubernetes resource, which is a Service in this case.
- metadata: Contains the Service’s metadata, including its name.
- spec: Defines the Service’s specifications.
- selector: Identifies the pods to route traffic to, based on labels.
- ports: Specifies the ports that the Service will expose.
- protocol: The protocol used (e.g., TCP).
- port: The port on which the Service is exposed.
- targetPort: The port on the pod that the Service should forward traffic to.
- type: Specifies the type of Service, which is ClusterIP in this example.
This Service will route traffic to any pod with the label app: my-web-app on port 8080, and expose it on port 80 within the cluster.
12. Volumes
In Kubernetes, volumes provide a way for containers in a pod to access and share data via the filesystem. They solve the problem of data persistence and sharing between containers
Persistent Volumes (PV), Persistent Volume Claims (PVC), and Storage Classes (SC)
- Persistent Volumes (PV): Storage resources in the cluster that have been provisioned by an administrator or dynamically using Storage Classes. They exist independently of any pod.
- Persistent Volume Claims (PVC): Requests for storage by users. PVCs consume PV resources and can specify size and access modes.
- Storage Classes: Storage Classes provide a way to describe the “classes” of storage available in a cluster. They define the provisioner (e.g., AWS EBS, GCE PD), parameters, and reclaim policy.

Types of Volumes
- emptyDir: A temporary directory that is created when a pod is assigned to a node and exists as long as that pod is running.
- hostPath: Mounts a file or directory from the host node’s filesystem into your pod.
- persistentVolumeClaim (PVC): A request for storage by a user, which can be dynamically or statically provisioned.
- configMap and Secret: Provide configuration data and sensitive information to pods.

Manifest example
An example of a Kubernetes manifest file for a Persistent Volume (PV) and a Persistent Volume Claim (PVC).
PV:
apiVersion: v1
kind: PersistentVolume
metadata:
  name: example-pv
spec:
  capacity:
    storage: 10Gi
  accessModes:
    - ReadWriteOnce
  persistentVolumeReclaimPolicy: Retain
  storageClassName: manual
  hostPath:
    path: "/mnt/data"
PVC:
apiVersion: v1
kind: PersistentVolumeClaim
metadata:
  name: example-pvc
spec:
  accessModes:
    - ReadWriteOnce
  resources:
    requests:
      storage: 10Gi
  storageClassName: manual
- The Persistent Volume (PV) is defined with a capacity of 10Gi and an access mode of ReadWriteOnce. It uses a hostPath for storage, which is suitable for development and testing.
- The Persistent Volume Claim (PVC) requests a volume with the same access mode and storage capacity.
- You can apply these manifests using kubectl apply -f <filename>.yaml.